Growing Asparagus
June 6, 2025

A long term investment for Springtime Delights

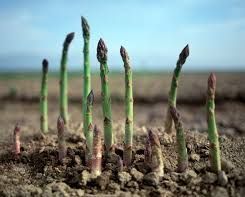
Asparagus is a springtime favourite, prized for its tender spears and distinct flavour. While it may take a few years of patience before you enjoy your first harvest, the payoff is a bountiful crop that returns year after year with proper care. Whether you're new to growing asparagus or looking to refine your technique, here's everything you need to know to cultivate this perennial delicacy successfully.


Starting Out

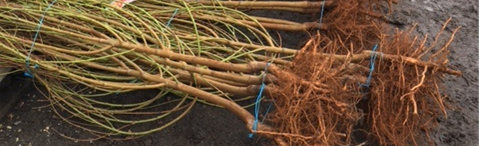
Although asparagus can be grown from seed, most gardeners opt to plant two-year-old crowns in winter for quicker and more reliable results. These crowns are typically from male plants, which are more productive and yield consistent crops.

One of the most common and dependable varieties available is Mary Washington.


Preparation

Choose a sunny location with well-drained soil. Asparagus thrives in rich, fertile beds that are high in organic matter.

Avoid areas that remain soggy during winter - excess moisture can lead to crown rot.

To prepare the bed:

  • Clear the area thoroughly of weeds.
  • Dig in plenty of compost and/or well-rotted manure.
  • Ensure excellent drainage to protect the crowns.


Planting Crowns the Right Way

  1. Create trenches about 30cm wide by 15–20cm deep along the row.
  2. Form small mounds of soil at the bottom and spread the roots over them.
  3. Plant crowns 30–50cm apart to give them ample room to grow.
  4. Start by covering the crowns with 5–7cm of soil. As the shoots emerge, gradually fill in the trench until it’s level with the ground.

 * Important: Be careful not to cover the new shoots completely as they begin to emerge.


Care and Maintenance

Keep the soil evenly moist, particularly in the first two years while plants establish. Add a thick layer of mulch to retain moisture and suppress weeds.

Feed generously with a high-nitrogen fertiliser throughout summer to promote healthy fern growth. Once the fern turns yellow in winter, cut it back to ground level and fertilise again in late winter to boost spring regrowth.


TOP TIP

Hilling Up for White Spears

To produce highly prized white asparagus (it makes the most delicious soup!), mound soil 25–30 cm high over the rows in winter. As the spear tips begin to break the surface, cut them about 15 cm below the soil line. The lack of sunlight prevents chlorophyll development, resulting in pale, tender spears.


Patience Pays Off: Harvesting Asparagus

growing asparagus

As tempting as it may be to harvest early, it’s crucial to let your plants mature first.


Year 1–2: No harvesting. Allow plants to focus on root and crown  development.


Year 3: Begin harvesting sparingly, cutting spears 15–20 cm long  just before the tips open.


Year 5+: Plants are well established and can be harvested more generously - every day or two for up to 8–10 weeks from August to October (depending on your climate).


Stop harvesting by December to let the ferns grow. This regrowth feeds the crowns, building strength for the next year’s crop.


Varieties to Try

  • Mary Washington: A classic, reliable green variety commonly sold in nurseries.
  • Purple Asparagus: A vibrant purple variety packed with anthocyanins. Best enjoyed raw or lightly cooked to preserve its unique colour (overcooking turns it green).


Growing asparagus requires time and care, but the reward is a low-maintenance perennial crop that delivers delicious spring harvests for up to 20 years. With the right preparation and a bit of patience, you’ll be serving up fresh, homegrown asparagus that far outshines anything store-bought.


Happy gardening!


June 6, 2025
A Simple Guide for Winter Success
June 4, 2025
How to Plant, Grow, and Love Your Paeonies
A close up of red and green peppers growing on a plant.
February 20, 2025
Spice up your life!
A close up of a cabbage with green leaves growing in a garden.
February 20, 2025
Cabbages are a fantastic winter crop and are perfect for adding to soups, stews, and salads. Cabbages are planted from seeds or seedlings as the cooler season begins. Choosing the Right Variety Some of the most popular cabbage varieties grown include White (Cannonball), Savoy, Red cabbage and Chinese cabbage. White (Cannonball) cabbage is a compact variety that is easy to grow and produces large heads. Savoy cabbage has crinkled leaves and a mild flavour, making it a great choice for salads. Red cabbage is a colourful variety that adds a splash of colour to any dish. Chinese cabbage include Bok Choy and Pac Choy and are popular in Asian cooking. Preparing the Soil Before planting your cabbage seedlings, you will need to prepare the soil. Cabbages require well-drained soil that is rich in organic matter. Start by digging over the soil and removing any weeds or debris. Next, add compost or well-rotted manure to the soil to improve its fertility. You can also add some blood and bone to provide essential nutrients for your plants. Planting Your Seedlings Once you have prepared your soil, it’s time to plant your cabbage seedlings. Space your seedlings around 30cm apart to allow them enough room to grow. After planting, water your seedlings thoroughly to help them establish their roots. Using a plant tonic such as Seasol will minimise transplant shock and help your plants to have the very best start. Caring for Your Cabbages To ensure that your cabbages grow healthy and strong, there are a few things you will need to do. Firstly, you will need to water your cabbages regularly. Although cabbages are grown through winter, the soil needs to remain moist so be sure you give them a good soaking during dry periods. You will also need to protect your cabbages from pests and diseases. Common cabbage pests include cabbage white butterflies, aphids, and caterpillars. To prevent these pests from damaging your plants, you can cover them with a fine mesh netting. You can also use organic pest control methods such as neem oil or pyrethrum spray.
There are many different types of flowers in this field.
February 20, 2025
Bright Blooms, Happy Vibes, and Garden Magic
A group of potted plants are sitting on a window sill.
February 20, 2025
Easy and Rewarding Herb Gardens
A bush with red flowers and green leaves
February 20, 2025
Learn How to Grow Callistemons with Stoneman's
A bunch of potted plants are growing on a window sill.
February 20, 2025
Growing Food in Containers 
A bunch of pink roses are growing on a bush.
February 20, 2025
A simple guide to pruning Bush Roses at home
A bunch of peaches hanging from a tree branch.
February 20, 2025
Winter is a great time to prune some of your deciduous fruit trees, berries, fruiting bushes and productive vines. Sharp and clean tools are essential for causing minimal damage to your fruiting plants. Before you begin any pruning wipe down cutting implement blades with Metholated Spirits or a 10% solution of Bleach. Repeat this process of cleaning your blades in between pruning each tree to ensure no transfer of any virus that may be present. Stone fruit, ie; Cherries, Apricots, Peaches, Nectarines and Kiwi Fruit should not be pruned in winter as they are prone to many water borne diseases that enter via open cuts when sap flow is low. These trees should be pruned immediately after fruiting in summer when sap flow is high and wounds heal quickly. Now is the time to prune and shape your Apple, Pear, Quince and Nut trees. The vase shape method of pruning is suitable for all fruit trees - the final shape should resemble a wide angled, open centred goblet (see below). The aim is to select three or four branches at least 50cm above the ground and each pointing in a different direction. These will become the main leaders of the future tree and will be subdivided again in later years to form sub leaders. Choose the best side branches and cut the main stem back to above the level of the highest side branch selected. Prune the outside shoots to an outside bud all at about the same level. If your tree is young and doesn’t have enough side branches, cut the main stem back to approximately 1m and select suitable branches the next year. This is a better option than using inferior branches. During the early years of the tree’s life, it is important to develop a framework that is sufficiently strong and capable of bearing the weight of crops borne. Be sure to remove any decaying fruit, leaves and your pruned branches as these harbor overwintering pests and disease. PEST CONTROL Winter is an important time to clean up fruit trees to prevent problems during the season ahead. Lime Sulphur sprayed liberally on all deciduous fruit trees is fantastic for the control of over-wintering pest and diseases. Copper Spray is best applied in late winter/early spring just as your trees begin to awaken from their slumber. Copper Spray will prevent stone fruit diseases such as Leaf Curl, Shot Hole and Mildew on newly emerging foliage. Timing of applying Copper Spray is important and the 1st spray should be applied as the buds begin to swell. The 2nd spray will need to applied when 80% of your flowers have dropped their petals and begun to set fruit. In Tasmania, due to our damp and humid weather in spring, trees will often require follow up spraying at fortnightly intervals until the weather dries. Monitor your trees for early signs of disease and remember - it's never too late to spray - as disease will spread to new leaves as they emerge.
More Posts